Preparing your learning space...
86% through Solution Design tutorials
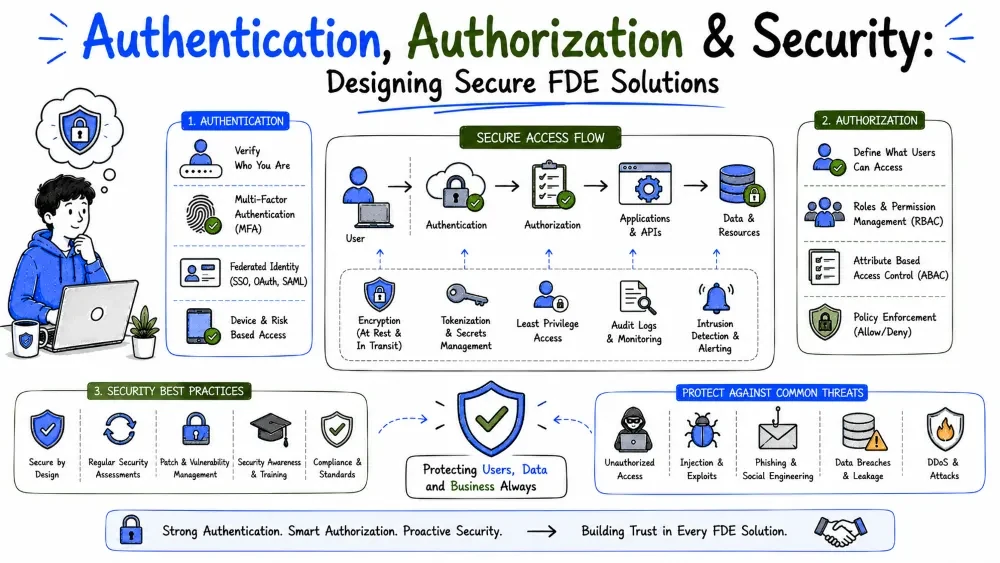
Every solution with users needs answers to two questions: who are you? (authentication) and what are you allowed to do? (authorization). Together they form the core of application security — which is not a feature added at the end, but a set of decisions woven through every layer of the design. This tutorial covers both halves of access control, then the design-level defenses around them: data protection, network boundaries, input handling, secrets, and dependencies.
The two words get mixed up constantly, but they're separate layers:
| Authentication (AuthN) | Authorization (AuthZ) | |
|---|---|---|
| Question | Who are you? | What may you do? |
| Happens | Once, at login | On every request |
| Produces | A verified identity | A permission decision |
| Example | Maria logs in with her password | Maria is a dispatcher, so she can reassign deliveries |
Authentication always comes first — you can't decide what someone may do until you know who they are. But a system can authenticate you perfectly and still authorize you badly; the two must each be designed.
Authentication checks something the user knows (password, PIN), has (phone code, hardware key), or is (fingerprint, face). Most business systems start with password + one extra factor. The mechanism matters less than the plumbing around it: how credentials are stored, how identity is carried after login, and what happens when things expire or fail.
Passwords are still the backbone of most logins, and most of the rules are about protecting them:
# Conceptual — use a proven library (e.g., bcrypt/argon2), never invent this
stored_hash = hash_password("correct-horse-battery")   # at signup

# at login:
if verify_password(submitted_password, stored_hash):
    log_user_in()
Common Mistake: building password storage from scratch with MD5 or SHA-256 alone. Use a purpose-built password-hashing function from a maintained library — this is not a place for creativity.
After login, the server needs to recognize the user on every following request. Two standard designs:
Session-based (server-side): the server creates a session record and gives the browser a session ID cookie.
Login → server stores session {user: maria, expires: 8h}
        browser gets cookie: session_id=abc123
Later → every request carries the cookie;
        server looks up abc123 to know it's Maria
Token-based (client-side, usually JWT): the server signs a token containing the user's identity; the client sends it back on each request.
Login → server signs token {sub: maria, role: dispatcher, exp: 8h}
Later → every request carries: Authorization: Bearer <token>
        server verifies the signature — no lookup needed
| Sessions | Tokens (JWT) | |
|---|---|---|
| Server state | Yes (session store) | No (signature is the proof) |
| Revoking access | Easy — delete the session | Hard — tokens live until they expire |
| Best for | Classic web apps | APIs, mobile apps, multiple services |
Note: for a typical FDE web solution, sessions are simpler and easier to revoke. Tokens shine when a mobile app or several services need to verify identity without sharing a session store. Either way: keep lifetimes short (hours, not months) and send credentials only over HTTPS.
In customer engagements you'll often be told: "our people log in with the company account." That's Single Sign-On (SSO) — your app delegates authentication to an identity provider (IdP) the customer already runs: Microsoft Entra ID (Azure AD), Okta, Google Workspace.
The standard protocol is OAuth 2.0 / OpenID Connect, and the flow looks like this:
1. User clicks "Sign in" in your app
2. Your app redirects to the customer's IdP login page
3. User authenticates THERE (your app never sees the password)
4. IdP redirects back with a signed token: "this is Maria, she's real"
5. Your app verifies the token and creates its own session
Why this matters for FDEs: SSO is often a hard customer requirement, and it's a gift — no password storage, no reset flow, and when the customer's IT disables someone centrally, your app is covered automatically. When an IdP exists, delegate authentication instead of building it (the build-vs-buy logic from Tutorial 3 applies perfectly here).
Multi-factor authentication (MFA) requires a second factor at login — typically a code from an authenticator app, an SMS, or a hardware key. It neutralizes the most common attack: a stolen or guessed password.
Design-wise, MFA is a second step between "password checked" and "session created":
Password OK  →  MFA challenge  →  code verified  →  session issued
                    (user is NOT logged in yet)
Enable it at least for admin and privileged roles; many customers require it for everyone.
Authorization runs on every request, not just at login: "this user, right now, is allowed to do this thing to this data." The three models you'll meet:
| Model | Rule shape | Example |
|---|---|---|
| Role-Based (RBAC) | Users have roles; roles have permissions | Dispatchers can reassign deliveries |
| Attribute-Based (ABAC) | Rules over attributes of user, resource, context | Only the assigned driver sees a delivery's customer phone number |
| ACL / per-resource | Permissions attached to each object | Maria can edit this report |
RBAC covers most business applications. Start with a small set of roles tied to real jobs, not to screens:
viewer      → read dashboards and reports
operator    → viewer + create/edit records
dispatcher  → operator + reassign deliveries
admin       → dispatcher + manage users and settings
Two rules keep RBAC sane:
A permission system is only as good as where it's checked. The rule: enforce in the backend, at the data boundary — not in the UI.
❌ Hiding the "Reassign" button from non-dispatchers
   (the API still accepts the call — anyone can send it)

✅ The API checks the caller's role on every request:
   if user.role not in ("dispatcher", "admin"):
       return 403 Forbidden
Hiding UI elements is fine for usability; it is never security. The server must reject unauthorized calls even if no button was ever shown.
Best Practice: centralize the check. One middleware/decorator like @require_role("dispatcher") on each route beats scattered if-statements — scattered checks are how one forgotten endpoint becomes a hole.
Access control is the front door; the rest of security is making sure there are no windows nobody noticed. A system's security is mostly decided before the first line of code: where the data lives, who can reach it, what crosses the boundary, and how identity is checked. Bolted-on security — a firewall here, a scan there — patches holes in a shape that was already wrong.
Three principles sit under everything that follows:
Note: in FDE work, security is also a trust topic. The customer's IT and compliance teams will review your design. A solution that answers their questions on paper — data location, access control, encryption — clears procurement; one that can't, stalls there.
Threat modeling is the habit of asking, for each part of the design, "how would this be abused?" A simple walk-through covers most of it:
A useful lens for step 3 — the classic categories of abuse:
| Threat | Question |
|---|---|
| Spoofing | Can someone pretend to be another user or system? |
| Tampering | Can data be modified in transit or storage? |
| Information disclosure | Can someone read data they shouldn't? |
| Denial of service | Can someone exhaust the system for everyone else? |
| Elevation of privilege | Can a normal user gain admin powers? |
You don't need a formal framework to get the value — an hour with the diagram asking these questions catches the large majority of design-level holes.
Data protection splits into three states, each with its own rule:
In transit — data moving over a network. Rule: HTTPS/TLS everywhere, no exceptions. Every URL, every API call, every webhook, including internal traffic when it crosses a network you don't fully control. Plain-HTTP endpoints are how credentials and data get intercepted.
At rest — data sitting in storage. Rules:
In use — data being processed or displayed. Rules: mask sensitive values in the UI (show •••• 4821, not the full card), restrict who can export, and never write sensitive data into logs.
Best Practice: start from the data, not the technology. List the sensitive data your solution touches, classify it (public / internal / confidential / regulated), and let the classification set the protection level. Regulated data (health records, payment data) carries legal obligations — surface those early, because they can reshape the whole architecture.
The network layer decides who can even reach your components:
Internet ──▶ [ Load balancer (public) ]
                    │
             private network
                    │
        ┌───────────┼───────────┐
        ▼           ▼           ▼
   [ API servers ] [ workers ] [ database ]   ← no public access
The most common application-level attacks all share one trick: untrusted input is treated as code or commands. The family name is injection.
SQL injection — input becomes part of a database query:
# ❌ Dangerous: user input glued into the query
query = f"SELECT * FROM users WHERE email = '{email}'"
# email = "x' OR '1'='1"  →  returns every user

# ✅ Safe: parameterized query — input stays data, never becomes SQL
query = "SELECT * FROM users WHERE email = %s"
db.execute(query, (email,))
Other members of the family:
| Attack | Where | Defense |
|---|---|---|
| SQL injection | Database queries | Parameterized queries / ORM — never string-concatenate input |
| Cross-site scripting (XSS) | HTML output | Escape output; let your framework's templating do it |
| Command injection | Shell calls | Don't pass user input to shell commands; use argument lists |
| Path traversal | File access (../../etc/passwd) | Validate and normalize file paths; keep a whitelist of allowed locations |
The universal rule: validate all input at the boundary — type, length, format, allowed values — and treat everything from outside (users, APIs, files, webhooks) as untrusted forever, not just at login.
Common Mistake: trusting "internal" input. Data that came from your own database was once typed by a user. Validate at every trust boundary, not only the first one.
Secrets are the credentials that open everything else: database passwords, API keys, tokens, signing keys. The rules are short and absolute:
❌  API_KEY = "sk-live-9f8e7d..."        # in app.py, committed to git
✅  API_KEY = os.environ["ERP_API_KEY"]   # injected by the platform
Note: before your first commit, check that a .gitignore covers .env and config files. A leaked cloud key found by automated scanners can cost real money within minutes — this is the most common real-world security incident in small projects.
Modern applications are mostly other people's code: frameworks, libraries, packages. Each dependency is a trust decision — a vulnerability in a library you import is a vulnerability in your system.
The discipline:
npm audit, pip-audit, Snyk) and actually act on critical findings.Assume-breach design needs detection: you must be able to see an attack happening and reconstruct it afterwards.
Log at minimum:
Two rules keep logs useful:
Requirements from discovery: drivers confirm deliveries on phones; dispatchers reassign; the office watches a dashboard; only finance exports invoicing data; customer phone numbers and proof photos are confidential.
Authentication design:
| User group | Method | Why |
|---|---|---|
| Office staff & dispatchers | SSO via the customer's Microsoft Entra ID + MFA | Customer requirement; central account control |
| Drivers | Email + password, MFA optional, short-lived token | Contractors without company accounts; token suits the mobile app |
Authorization design (RBAC):
| Role | Permissions |
|---|---|
| driver | Confirm own deliveries; see own route |
| dispatcher | Everything drivers see + reassign any delivery |
| office_viewer | Read-only dashboards and reports |
| finance | office_viewer + export invoicing data |
| admin | All of the above + manage users and roles |
Enforcement: every API route carries a role check; the "own deliveries" rule for drivers is a data-scope check (delivery.driver_id == user.id) on top of the role check. The UI hides what you can't do, but the API refuses it either way.
The security layers around it:
| Layer | Decision | Principle |
|---|---|---|
| Data classification | Delivery records = internal; phone numbers = confidential; proof photos = confidential | Start from the data |
| In transit | HTTPS on every endpoint, including driver sync and the ERP sync job | TLS everywhere |
| At rest | Managed Postgres encryption on; photos encrypted in object storage; phone numbers masked on the dashboard | Encryption + minimization |
| Boundary | Only the load balancer is public; DB and workers private; ERP sync job validates a shared signature | Private by default |
| Input | Parameterized queries throughout; uploads restricted to image types and size-capped | Validate at the boundary |
| Secrets | All keys in the platform's secrets manager; separate keys per environment; rotation on staff change | Secrets hygiene |
| Detection | Alerts on repeated failed logins and permission denials; audit log for role changes and exports | Assume breach |
The pattern to notice: none of this is exotic technology. It's standard features of managed platforms and frameworks, configured deliberately. That's the realistic bar for FDE security work — disciplined use of boring, proven defenses.
Save your progress and earn XP for completing tutorials.
4 questions · Pass with 70%+
1What is the fundamental difference between authentication and authorization?
2What is the recommended approach for password storage?
3 Where should authorization enforcement primarily occur?
4What does the tutorial identify as the most common real-world security incident in small projects?
Technology
Forward Deployed Engineer
Lesson group
Solution Design
Progress
86% complete

