Preparing your learning space...
50% through CISCO Packet Tracer tutorials
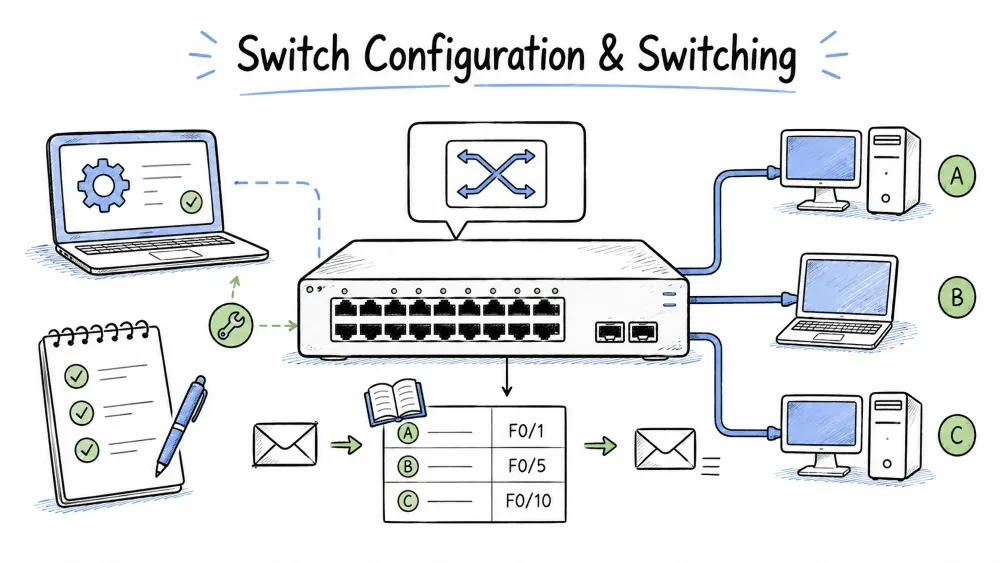
Switching is the process of forwarding data frames between devices on the same Local Area Network (LAN). A switch is a Layer 2 (Data Link Layer) networking device that uses MAC addresses to make forwarding decisions. Unlike a hub which blindly repeats data to all ports, a switch intelligently sends data only to the intended destination device, making networks more efficient and secure.
A switch operates at Layer 2 of the OSI model. It forwards frames based on the destination MAC address embedded in each frame. The switch maintains a MAC address table (also called a CAM table — Content Addressable Memory) to track which device is connected to which port.
The switching process is the sequence of operations a switch performs when it receives a frame on one of its ports. Understanding this process is fundamental to understanding how LANs function.
       ┌─────────────────────────────────────────────────┐
       │                 Switch's Logic                  │
       │                                                 │
       │  Frame arrives on Fa0/1                         │
       │  → Learn source MAC = 00:1A:2B:3C:4D:5E on Fa0/1│
       │  → Look up destination MAC in table             │
       │  → Found? Forward to that port only             │
       │  → Not found? Flood to all ports except Fa0/1   │
       └─────────────────────────────────────────────────┘
The MAC address table is a database stored in the switch's memory that maps MAC addresses to specific switch ports. The switch builds this table dynamically by examining the source MAC addresses of incoming frames. This table allows the switch to make intelligent forwarding decisions.
Switch# show mac address-table
          Mac Address Table
-------------------------------------------
Vlan    Mac Address       Type        Ports
----    -----------       --------    -----
   1    00:1A:2B:3C:4D:5E DYNAMIC     Fa0/1
   1    00:1A:2B:3C:4D:5F DYNAMIC     Fa0/2
   1    00:1A:2B:3C:4D:60 DYNAMIC     Fa0/3
| Field | Meaning |
|---|---|
| Vlan | The VLAN in which the MAC address was learned |
| Mac Address | The 48-bit hardware address of the device |
| Type | DYNAMIC = learned automatically, STATIC = manually configured, STICKY = port-security learned |
| Ports | The switch port connected to the device |
Switch forwarding methods determine how a switch handles incoming frames before forwarding them. Different methods balance between speed (low latency) and accuracy (error checking). The choice depends on the network requirements for performance versus reliability.
| Method | How It Works | Latency | Error Checking |
|---|---|---|---|
| Store-and-Forward | Receives the entire frame, checks CRC (Cyclic Redundancy Check) for errors, then forwards | Highest | Full CRC check — drops corrupt frames |
| Cut-Through | Reads only the destination MAC address (first 6 bytes) and starts forwarding immediately | Lowest (minimal) | None — corrupt frames are still forwarded |
| Fragment-Free | Reads the first 64 bytes (Ethernet collision window), checks for fragments/runts, then forwards | Medium | Partial — filters runts but not CRC errors |
In Practice: Modern enterprise switches almost always use Store-and-Forward because the latency difference is negligible with today's hardware, and error checking is critical for network reliability.
The Command Line Interface (CLI) is the text-based interface used to configure, monitor, and troubleshoot Cisco switches. Unlike the graphical interface of a PC, the CLI requires the user to type specific commands. Mastering the CLI is essential for any network professional as it provides the most precise and powerful control over network devices.
Connection methods refer to the different ways you can connect to a switch to access its CLI. Each method serves a different purpose — console access is used for initial setup, while remote access (Telnet/SSH) is used for ongoing management.
| Method | Connection Type | Security | When to Use |
|---|---|---|---|
| Console | Direct (serial/USB cable) | Physical access only | Initial configuration, password recovery, troubleshooting when network is down |
| Telnet | Over the network (TCP/23) | None — plaintext passwords and data | Lab environments only — not recommended for production |
| SSH (Secure Shell) | Over the network (TCP/22) | Encrypted — all traffic is secured | Production networks, remote management |
In Packet Tracer, the CLI is accessed through a dedicated tab on each network device. This simulates a physical console connection, allowing you to configure the switch exactly as you would in a real network environment.
Switch>enable to enter Privileged EXEC mode — prompt changes to Switch#CLI modes are hierarchical levels of access on a Cisco device. Each mode provides different levels of privileges — from basic monitoring (User EXEC) to global configuration (Global Config) to interface-specific settings. You must navigate through these modes in sequence to configure the device.
| Mode | Prompt | How to Enter | Purpose |
|---|---|---|---|
| User EXEC | Switch> | Default on login | View basic status, ping, traceroute |
| Privileged EXEC | Switch# | enable command | View full config, debug, save, reload |
| Global Config | Switch(config)# | configure terminal | System-wide settings (hostname, passwords) |
| Interface Config | Switch(config-if)# | interface fa0/1 | Per-port settings (speed, duplex) |
| Line Config | Switch(config-line)# | line console 0 or line vty 0 15 | Console/remote access settings |
Switch> enable                          ← Enter Privileged EXEC
Switch# configure terminal              ← Enter Global Config
Switch(config)# hostname MySwitch       ← Set name
MySwitch(config)# interface fa0/1       ← Enter Interface Config
MySwitch(config-if)# speed 100          ← Set port speed
MySwitch(config-if)# exit
MySwitch(config)# exit
MySwitch# copy running-config startup-config   ← Save config
Basic switch configuration is the set of initial commands needed to make a switch operational and manageable on a network. This includes setting a hostname, configuring access passwords, enabling remote management (SSH), setting a management IP address, and saving the configuration.
The hostname is the device name that appears in the CLI prompt and identifies the switch on the network. A descriptive hostname helps network administrators identify the device's location, role, or purpose (e.g., Floor1-Switch, Core-SW-01).
Switch> enable
Switch# configure terminal
Switch(config)# hostname Sales-Switch
Sales-Switch(config)#
Naming Convention Best Practice: Use a consistent naming scheme like
[Location]-[Role]-[Number]e.g.,NYC-Core-SW-01,Floor2-Access-SW-05.
Console access configuration secures the physical console port (used for direct cable connections). Setting a password prevents unauthorized users from accessing the switch through a direct physical connection.
Sales-Switch(config)# line console 0
Sales-Switch(config-line)# password cisco
Sales-Switch(config-line)# login
Sales-Switch(config-line)# exit
| Command | Purpose |
|---|---|
line console 0 | Enter console line configuration mode |
password cisco | Set the password required at login |
login | Enable password checking at login |
VTY (Virtual Teletype) lines are virtual terminal connections used for remote access via Telnet or SSH. A switch typically supports 16 simultaneous remote sessions (lines 0–15). Configuring VTY passwords is essential to prevent unauthorized remote access to the switch.
Sales-Switch(config)# line vty 0 15
Sales-Switch(config-line)# password cisco
Sales-Switch(config-line)# login
Sales-Switch(config-line)# exit
Security Warning: Telnet sends all data (including passwords) in plaintext. Anyone capturing network traffic can see your credentials. Use SSH instead for any production or sensitive network.
SSH (Secure Shell) is an encrypted remote access protocol that provides a secure alternative to Telnet. SSH encrypts all data — including passwords and configuration commands — preventing eavesdropping. It requires a hostname, domain name, RSA encryption keys, and local user authentication.
Sales-Switch(config)# ip domain-name netgram.local
Sales-Switch(config)# crypto key generate rsa
How many bits in the modulus [512]: 1024
Sales-Switch(config)# username admin secret cisco123
Sales-Switch(config)# line vty 0 15
Sales-Switch(config-line)# login local
Sales-Switch(config-line)# transport input ssh
Sales-Switch(config-line)# exit
| Command | Purpose |
|---|---|
ip domain-name | Required for RSA key generation |
crypto key generate rsa | Creates the encryption keys — use at least 1024 bits |
username admin secret | Creates a local user with encrypted password |
login local | Use local username database for authentication |
transport input ssh | Only allow SSH connections (block Telnet) |
The enable password (or enable secret) controls access to Privileged EXEC mode (#). Without it, users in User EXEC mode (>) cannot enter configuration commands. enable secret is encrypted (MD5) and takes precedence over the plaintext enable password.
Sales-Switch(config)# enable password cisco         ! Weak — stored as plaintext
Sales-Switch(config)# enable secret cisco123         ! Strong — encrypted with MD5
Important: Always use
enable secret. If both are configured,enable secretoverridesenable password. Never useenable passwordin production.
A switch needs an IP address for remote management (telnet/SSH/ping). This is configured on a Switch Virtual Interface (SVI) — typically VLAN 1, which is the default management VLAN.
Sales-Switch(config)# interface vlan 1
Sales-Switch(config-if)# ip address 192.168.1.100 255.255.255.0
Sales-Switch(config-if)# no shutdown
Sales-Switch(config-if)# exit
Sales-Switch(config)# ip default-gateway 192.168.1.1
Why a default gateway? If you want to manage the switch from a different network, the switch needs a default gateway (router) to route return traffic. Without it, the switch can only be managed from within its own subnet.
Speed and duplex settings configure how a switch port communicates at the physical layer. Speed determines the data rate (10, 100, or 1000 Mbps). Duplex determines whether communication is one-way (half-duplex) or two-way simultaneously (full-duplex). Mismatched settings are a common cause of network performance issues.
Sales-Switch(config)# interface fastEthernet 0/1
Sales-Switch(config-if)# speed 100          ! 100 Mbps
Sales-Switch(config-if)# duplex full        ! Full-duplex (send and receive simultaneously)
Sales-Switch(config-if)# exit
| Duplex Setting | Description |
|---|---|
| Auto | Negotiate with the connected device (default — recommended) |
| Full | Send and receive simultaneously — maximum performance |
| Half | Only send or receive at one time — like a walkie-talkie |
Saving the configuration writes the running configuration (current active settings in RAM) to the startup configuration (file in NVRAM that loads on boot). If you do not save, all configuration changes are lost when the switch is powered off or rebooted.
Sales-Switch# copy running-config startup-config
Destination filename [startup-config]? [Press Enter]
Or the shorthand version:
Sales-Switch# write memory
The Spanning Tree Protocol (STP) is a network protocol that prevents Layer 2 loops in networks with redundant links. Without STP, redundant paths would cause broadcast storms, multiple frame copies, and MAC address table instability — all of which can bring a network to a complete halt. STP ensures that only one active path exists between any two network segments at any time.
In networks with redundant links (multiple paths between switches), frames can loop indefinitely. This causes:
STP solves these problems by blocking some ports to create a loop-free tree topology while keeping redundant links available as backups.
      ┌──────────┐                 ┌──────────┐
      │ Switch A │─────────────────│ Switch B │
      └─────┬────┘                 └─────┬────┘
            │                           │
            │      (Redundant Link)      │
            └───────────────────────────┘

🔴 Without STP: Frames loop forever → Network crash
🟢 With STP: One link is blocked → Loop prevented
STP port states define what a port can and cannot do during the STP convergence process. Each state serves a specific purpose in ensuring that loops are prevented before a port starts forwarding traffic. Understanding these states is essential for troubleshooting slow network connectivity after a link failure.
| State | Purpose | Forwarding Traffic? | Learning MACs? | Time |
|---|---|---|---|---|
| Blocking | Prevents loops by blocking non-designated ports | No | No | 20 sec (Max Age) |
| Listening | Listening for BPDUs, no forwarding yet | No | No | 15 sec (Forward Delay) |
| Learning | Learning MAC addresses, still no forwarding | No | Yes | 15 sec (Forward Delay) |
| Forwarding | Full operation — forwards frames and learns MACs | Yes | Yes | Stable state |
| Disabled | Administratively shut down | No | No | Manual |
Total convergence time: Without optimizations, STP takes 50 seconds (20 + 15 + 15) for a port to transition from blocking to forwarding. This is why STP optimizations like PortFast are important for end-user ports.
The Root Bridge is the reference point for the entire spanning tree topology. All switches determine their best path to the Root Bridge, and redundant paths are blocked accordingly. The switch with the lowest Bridge ID (priority + MAC address combination) becomes the Root Bridge.
Bridge ID = Bridge Priority + Extended System ID (VLAN) + MAC Address
            (4 bits)            (12 bits)                  (48 bits)

Example: 32768:10:0050.7966.6801
         Priority: 32768
         VLAN: 10
         MAC: 0050.7966.6801
Configuring Root Bridge:
! Method 1: Set priority (lower = better, multiples of 4096)
Sales-Switch(config)# spanning-tree vlan 1 priority 4096

! Method 2: Use the macro (recommended)
Sales-Switch(config)# spanning-tree vlan 1 root primary
PortFast is an STP optimization that allows a switch port to transition immediately from blocking to forwarding, bypassing the Listening and Learning states. PortFast should only be enabled on access ports connected to end devices (PCs, printers, servers) — never on trunk ports or ports connected to other switches.
Sales-Switch(config)# interface fastEthernet 0/1
Sales-Switch(config-if)# spanning-tree portfast
BPDU Guard is a security feature that protects the network against rogue switches or unauthorized STP configurations. If a port with BPDU Guard enabled receives a Bridge Protocol Data Unit (BPDU) — which only switches send — the port is immediately error-disabled (shut down). This prevents attackers from connecting their own switches and influencing the STP topology.
Sales-Switch(config)# interface fastEthernet 0/1
Sales-Switch(config-if)# spanning-tree bpduguard enable
Best Practice: Enable PortFast and BPDU Guard together on all access ports. This provides both faster connectivity and protection against rogue switches.
Port Security is a Cisco switch feature that controls which devices (identified by MAC address) are allowed to connect to a specific switch port. It helps prevent unauthorized devices from accessing the network by limiting the number of MAC addresses learned per port and taking action if a violation occurs.
Port Security works by:
The basic port security configuration enables the feature, sets the maximum number of allowed MAC addresses, determines how MAC addresses are learned, and specifies what action to take on violation.
Sales-Switch(config)# interface fastEthernet 0/1
Sales-Switch(config-if)# switchport port-security
Sales-Switch(config-if)# switchport port-security maximum 2
Sales-Switch(config-if)# switchport port-security mac-address sticky
Sales-Switch(config-if)# switchport port-security violation shutdown
| Command | Purpose |
|---|---|
switchport port-security | Enable port security on the interface |
maximum 2 | Allow only 2 MAC addresses on this port |
mac-address sticky | Dynamically learn and "stick" the first MAC(s) to the running config |
violation shutdown | Shut down the port on violation |
Sticky MAC addresses are MAC addresses that the switch learns dynamically and then saves ("sticks") to the running configuration. This means the switch remembers which device was connected to which port, even if the device disconnects and reconnects. This combines the convenience of dynamic learning with the security of static configuration.
! After configuration, the running config shows:
interface FastEthernet0/1
 switchport port-security
 switchport port-security mac-address sticky
 switchport port-security mac-address sticky 0050.7966.6801
Violation modes determine what the switch does when a port security violation occurs (e.g., an unauthorized device connects, or more MAC addresses than allowed are detected). The choice of mode depends on how strictly you want to enforce security.
| Mode | Action Taken | Traffic Blocked? | Manual Intervention? | Sends SNMP Trap? |
|---|---|---|---|---|
| shutdown | Port enters errdisabled state | ✅ All traffic blocked | ✅ Yes — must manually re-enable | Yes |
| restrict | Frames from violating MAC are dropped | ✅ Only violating frames pass | ❌ No — port stays up | Yes |
| protect | Frames from violating MAC are silently dropped | ✅ Only violating frames pass | ❌ No — no notification | No |
When a port enters the errdisabled state due to a security violation, it remains shut down until manually recovered. Recovery involves administratively shutting the port and re-enabling it, or using automatic errdisable recovery.
Manual Recovery:
Sales-Switch(config)# interface fastEthernet 0/1
Sales-Switch(config-if)# shutdown
Sales-Switch(config-if)# no shutdown
Automatic Recovery (Global Configuration):
Sales-Switch(config)# errdisable recovery cause psecure-violation
Sales-Switch(config)# errdisable recovery interval 300   ! 5 minutes
CDP (Cisco Discovery Protocol) and LLDP (Link Layer Discovery Protocol) are Layer 2 protocols that allow network devices to discover information about neighboring devices. They share details like device name, platform, IOS version, and IP address. CDP is Cisco-proprietary; LLDP is an IEEE standard (802.1AB) that works with multi-vendor networks.
! Enable CDP globally
Sales-Switch(config)# cdp run

! Enable/disable CDP on a specific interface
Sales-Switch(config)# interface fastEthernet 0/1
Sales-Switch(config-if)# cdp enable

! View CDP neighbors
Sales-Switch# show cdp neighbors

! View detailed CDP info about a neighbor
Sales-Switch# show cdp neighbors detail
Security Note: In production networks, CDP/LLDP are sometimes disabled on external-facing ports to prevent information leakage.
This is a complete, production-style switch configuration that combines all the concepts covered in this tutorial. Use this as a reference template when configuring switches in your labs or real networks.
! ──── Switch: Sales-Switch (Cisco 2960) ────
!
! Basic device identification
hostname Sales-Switch
!
! Management IP address (VLAN 1 — default)
interface vlan 1
 ip address 192.168.1.100 255.255.255.0
 no shutdown
!
! Default gateway for remote management
ip default-gateway 192.168.1.1
!
! Access ports — PC connections
interface range fastEthernet 0/1-10
 description PC Access Ports
 switchport mode access
 spanning-tree portfast           ! Skip STP delay for end devices
 spanning-tree bpduguard enable   ! Block rogue switches
 switchport port-security
 switchport port-security maximum 2
 switchport port-security mac-address sticky
 switchport port-security violation shutdown
 no shutdown
!
! Uplink to Core Switch
interface gigabitEthernet 0/1
 description Uplink to Core-SW
 no shutdown
!
! SSH Configuration
ip domain-name netgram.local
crypto key generate rsa modulus 1024
username admin secret cisco123
!
! Remote access lines — SSH only
line vty 0 15
 login local
 transport input ssh
!
! Console access
line console 0
 password cisco
 login
!
! Privileged access
enable secret cisco123
!
! Save configuration
copy running-config startup-config
Verification commands are used to confirm that your switch configuration is working correctly. Troubleshooting commands help identify issues when the network is not functioning as expected. Together, these are the most important tools in a network administrator's toolkit.
| Command | What It Shows | When to Use |
|---|---|---|
show running-config | Current active configuration | Before and after making changes |
show startup-config | Saved configuration in NVRAM | After saving to confirm |
show interfaces status | Port status, speed, duplex | Quick interface overview |
show interfaces fa0/1 | Detailed port statistics, errors, CRC | Investigating a specific port issue |
show mac address-table | MAC address table (CAM) | Verify MAC learning is working |
show mac address-table dynamic | Only dynamically learned MACs | Filter out static entries |
show spanning-tree | STP state per port | Verify root bridge and port roles |
show port-security | Port security settings summary | Quick security audit |
show port-security interface fa0/1 | Port security on a specific port | Investigate a violation |
show cdp neighbors | Adjacent Cisco devices discovered | Verify connections between switches |
show cdp neighbors detail | Detailed neighbor info (IP, IOS, platform) | Useful for documentation |
write memory | Save config (alias for copy running-config startup-config) | After every configuration change |
This lab demonstrates how STP prevents loops when two switches are connected with redundant links.
       PC-A ────┐
                ├─── Switch1 ──── Link1 (Gi0/1) ──── Switch2
       PC-B ────┘                │
                                 └─── Link2 (Gi0/2) ──── Switch2
| Device | IP Address | Connected To |
|---|---|---|
| PC-A | 192.168.1.1/24 | Switch1 Fa0/1 |
| PC-B | 192.168.1.2/24 | Switch1 Fa0/2 |
| PC-C | 192.168.1.3/24 | Switch2 Fa0/1 |
| PC-D | 192.168.1.4/24 | Switch2 Fa0/2 |
| Test | Expected Result |
|---|---|
| All PCs can ping each other | ✅ Success |
show spanning-tree on Switch1 | ✅ Shows one port in Forwarding, one in Blocking |
| Disconnect Link 1 (shut Gi0/1) | ✅ STP unblocks Link 2 — connectivity maintained after ~50s |
| All PCs can still ping after link failure | ✅ Success (STP reconverged) |
Save your progress and earn XP for completing tutorials.
Technology
Cyber Security & Networking
Lesson group
CISCO Packet Tracer
Progress
50% complete

